The Linux kernel for Sony Xperia phones is open source. So nobody is stopping you from compiling your own custom kernel. All you need is a Linux machine, the kernel sources and a couple of tools.
I will explain the steps needed to build, package and flash a custom kernel by using the Xperia T (LT30p) as an example. The steps should be pretty similar for all other modern Xperia phones.
Step 0: Preparation
A Linux machine
I used LMDE 64bit, which is basically Debian. But anything will do. If your machine is powerful enough to compile a regular kernel then it’s certainly powerful enough to compile the Android kernel.
The Kernel Source
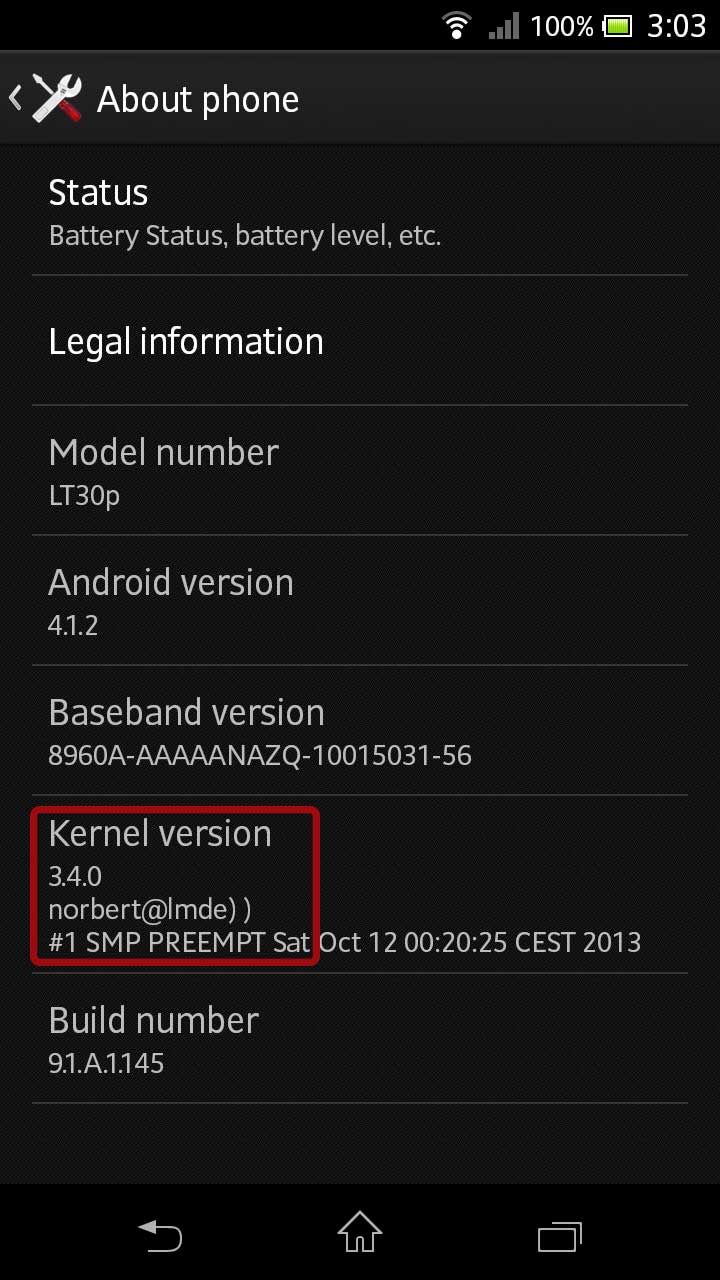
Get the source from here: Sony Developer World – Open Source Downloads. Look out for the version that matches the version of your phone’s firmware. For instance I have a Xperia T (LT30p) with firmware 9.1.A.1.145. So the matching kernel is this one: Open source archive for build 9.1.A.1.145
Tools
You need to get a couple tools which will help you to build the kernel and to package the kernel into a flashable form.
- A cross compiler toolchain for ARM processors
- Fastboot: A superb firmware tool for Xperia phones
- Android Platform tools: Fastboot
- A stock kernel.sin or kernel.elf of the same firmware
I will mention where to get those tools in each respective section.
Step 1: Compiling the Kernel
In this tutorial, I’ll put all the necessary files in a working directory named /android. So if you are using a different working directory replace /android wherever necessary.
Before we start, we need to make sure that a couple required packages are installed (this is for Debian – use your favorite package manager if you are using a different Linux distro):
sudo apt-get install git libncurses5-dev lzop
Now download the kernel source. As I mentioned above, search for the kernel that matches your phones firmware. I used the one for the Xperia T.
wget http://dl-developer.sonymobile.com/code/copylefts/9.1.A.1.145.tar.bz2
Extract the kernel source:
mkdir source
cd source
tar xjf ../9.1.A.1.145.tar.bz2
Since we are compiling a kernel for a different hardware architecture then the machine we are compiling on, we need a cross compiler which will generate a kernel binary that is compatible with our phone’s processor. The Xperia T uses an ARM processor. Therefore we need a cross compiler toolchain for the ARM processor. The git repositiry at android.googlesource.com contains a fully prebuilt toolchain. We only need to download it:
git clone https://android.googlesource.com/platform/prebuilts/gcc/linux-x86/arm/arm-eabi-4.6
Now we need to set two environment variables in order for the build process to know for which architecture to build and which cross compiler to use:
export ARCH=arm
export CROSS_COMPILE=/android/arm-eabi-4.6/bin/arm-eabi-
We are ready to build the kernel. The first step is to pick the correct config:
cd /android/source/kernel/
make blue_mint_defconfig
This has fetched the correct config and has put it in the file .config. In my example blue_mint stands for the Xperia T. There is a file called README_Xperia, which contains the configuration names for the different phones the kernel source can be used for. If you have downloaded the correct source, then you should be able to find the configuration name for your phone in README_Xperia. If your phone is not listed, then you have probably the wrong kernel source. In my case the kernel source is only suitable for the Xperia T (blue_mint_defconfig) and the Xperia V (blue_tsubasa_defconfig).
The next two steps are exactly the same as compiling a kernel for a “normal” Linux machine. First we check the configuration:
make menuconfig
This will display a menu driven configuration screen. Here you can add and remove certain kernel features like file systems or device drivers. For example if you want to be able to mount NFS drives over the network, you need to enable NFS support in File Systems -> Network File Systems -> NFS client support.
Exit and save your configuration if you made changes.
Now all that’s left is to compile the kernel image:
make
This will take a while. Once it is finished, there will be a kernel image in arch/arm/boot/zImage.
Step 2: Building the kernel.elf
The kernel image needs to be combined with an initial ramdisk and a couple other files to form a kernel.elf file. The kernel.elf file can finally be flashed to the phone via a USB cable.
The initial RAM disk (initrd) is a temporary root file system that is mounted during system boot. It contains various executables and drivers that permit the real root file system to be mounted.
In order to acquire the ramdisk we need to extract it from an existing kernel.elf. You can extract the firmware from your phone or download the firmware from the Internet. The xda developers forum is an excellent place to start looking for firmware files for your phone. In my case I downloaded the stock firmware in FTF-form from here and extracted the kernel.elf from it. In many cases you can also find the kernel.elf itself. It’s most of the times called boot.img however.
The FTF-File is basically just a zip archive. Unzip it. We only need a file called kernel.sin from that archive. In order to further extract files from kernel.sin we use Flashtool. It can be downloaded from Flashtool’s website. Extract and start Flashtool:
7z e flashtool-0.9.11.0-linux.tar.7z
tar xf flashtool-0.9.11.0-linux.tar
cd FlashTool
sudo ./FlashTool
Flashtool can extract kernel.sin for us now. In the menu click on Tools->Sin Editor. Then select the sin file and extract the data:
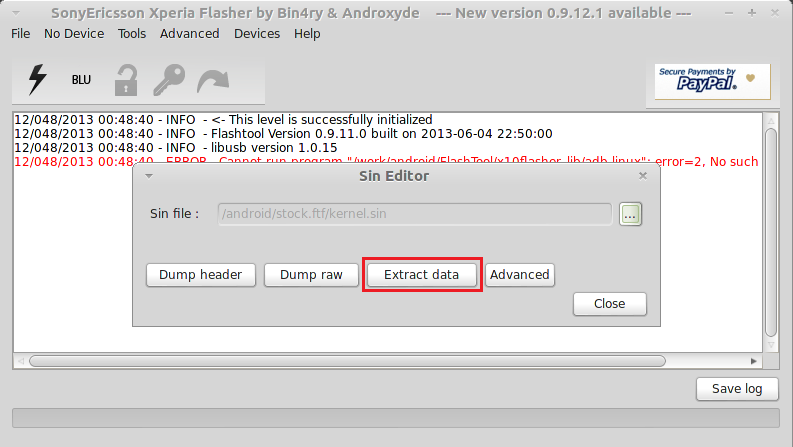
This will give you the kernel.elf file. The kernel.elf itself needs to be extracted as well. Click on Tools->Extractors->Elf and select the elf file:
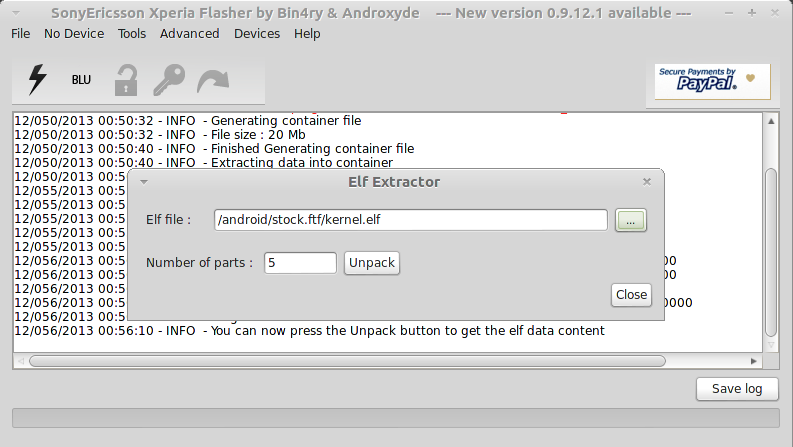
You should end up with following files:
-rw-r--r-- 1 norbert norbert 20971520 Oct 12 00:55 kernel.elf
-rw-r--r-- 1 norbert norbert      130 Oct 12 00:57 kernel.elf.bootcmd
-rw-r--r-- 1 norbert norbert     1072 Oct 12 00:57 kernel.elf.cert
-rw-r--r-- 1 norbert norbert  5655400 Oct 12 00:57 kernel.elf.Image
-rw-r--r-- 1 norbert norbert  1512035 Oct 12 00:57 kernel.elf.ramdisk.gz
-rw-r--r-- 1 norbert norbert   133372 Oct 12 00:57 kernel.elf.rpm.bin
-rw-r--r-- 1 norbert norbert       16 Oct 12 00:55 kernel.partinfo
-rw-r--r-- 1 norbert norbert  7306651 Jul 25 11:54 kernel.sin
Now we need a little script, which let’s us reassemble all the parts again to our own kernel.elf. It can be downloaded from Sony’s Developer Site:
wget http://dl-developer.sonymobile.com/tools/image_generation_script_for_Xperia_smartphones.zip
unzip image_generation_script_for_Xperia_smartphones.zip
It contains only a sinlge python script named mkelf.py. Put that script into the same directory where you extracted the original kernel.elf.
Now also copy our compiled custom kernel into the same directory:
cp /android/source/kernel/arch/arm/boot/zImage .
All that’s left is to combine all the parts to our new kernel.elf. I will call it mykernel.elf here. The command line deviates for different phone models. Use goggle to find the appropriate arguments. Again, this example is for the Xperia T:
python mkelf.py -o mykernel.elf zImage@0x80208000 kernel.elf.ramdisk.gz@0x81400000,ramdisk kernel.elf.rpm.bin@0x20000,rpm kernel.elf.bootcmd@0x00000000,cmdline
That’s it. mykernel.elf is now ready to be flashed to the phone.
Step 3: Flashing the new Kernel
We need fastboot from the android platform tools, which can flash the kernel to the phone:
sudo apt-get install android-tools-adb android-tools-fastboot
If you can’t find a package for your distro, you can also get the platform tools by downloading the Android SDK.
Now turn off your phone. Once the phone has shut down, hold the Vol+ button while plugging in the USB cable. The phone should now be in fastboot mode, which is indicated by a blue lit LED. Note that the button to get into fastboot mode is possibly different on other Sony phones. Take a look at this overview.
Check if the connection is ok:
norbert@lmde:/android/mykernel$ sudo fastboot getvar version
version: 0.5
finished. total time: 0.006s
Finally we can flash our kernel:
norbert@lmde:/android/mykernel$ sudo fastboot flash boot mykernel.elf
sending 'boot' (7129 KB)...
(bootloader) USB download speed was 5427kB/s
OKAY [  1.368s]
writing 'boot'...
(bootloader) Flash of partition 'boot' requested
(bootloader) S1 partID 0x00000003, block 0x00003000-0x0000cfff
(bootloader) Erase operation complete, 0 bad blocks encountered
(bootloader) Flashing...
(bootloader) Flash operation complete
OKAY [  0.434s]
finished. total time: 1.802s
We can also reboot the phone via fastboot:
sudo fastboot reboot
If all went well, you should see the Sony logo and the phone should boot as usual. Congratulations, your phone is now the owner of a brand new kernel.
In Case of Disaster
Of course to flash a home made kernel is nothing for the faint of heart. If something goes wrong, and believe me, something will go wrong sooner or later, your phone will not greet you with the familiar Sony logo again. Instead it will sulk with a black screen. You bricked it.
But don’t panic. Sony phones are pretty sturdy and it is almost impossible to really brick them. Usually you only need to soft-reset them to get into fastboot mode again.
Unplug und plug in the USB-cable. Hold Vol+ and the ON-button at the same time for a couple seconds until you feel a single vibration. Let go of the ON-button but keep the Vol+ pressed. You should be in fastboot mode again indicated by the blue LED. Now you can reflash the original kernel.elf with fastboot in order to get the phone working again.
If you can’t get your phone into fastboot mode, check out following xda-developer post, which contains everything you need to know to unbrick your phone: Recover ALL 2012 XPERIAs from SOFT-brick.