Update: In the meantime I developed a user friendly Python program which does all the work with a single command line: SPEER – Samsung Printer EEprom Resetter for Raspberry Pi.
Lousy Business Practices
A little bit more than a year ago I bought a used Samsung CLP-510 color laser printer for a few bucks. It printed fine, but I suspected that the toner was probably almost empty. And with laser printers it’s almost as bad as with ink jets. New toner cartridges are more expensive than the value of the printer. It is even worse with color laser printers, since they need four cartridges. But I figured that I would try to refill the toner cartridges once the time comes. So I bought it. It turned out that the toner cartridges where not completely empty. I used the printer for almost a year. But eventually the printer informed me that it was empty. It contains three toner cartridges:
- CLP-510D7K/ELS – That’s the black color for 7000 pages.
- CLP-510D5C/ELS – That’s the cyan color for 5000 pages.
- CLP-510D5M/ELS – That’s the magenta color for 5000 pages.
- CLP-510D5Y/ELS – That’s the yellow color for 5000 pages.
The black one was the one which was empty first. So no problem, I thought. Let’s refill them with some new colorful powder. Only then I found out that the cartridges contain a build-in page counter – a little electronic circuit board – which stops you from using the cartridge even if it’s refilled. Well, those are really lousy business practices if you ask me. The manufacturer forces you to buy an expensive new cartridge, even though it would continue to work perfectly by refilling it. Luckily there are some solutions to that problem.
- You can replace the counter board inside the cartridge with a new one. You can buy those for a few bucks on eBay.
- You can reset the page counter by reprogramming the EEPROM of the toner counter board.
Solution 2 sounded really geeky. So I went for that.
There already exists a tool called SSBR – Sad Samsung EEPROM Backup/Restore Utility (cool name!). It runs on MS-DOS. And you have to fabricate a connector cable which connects the parallel port of a PC to the three contacts of the toner cartridge. There are however some problems with that.
- Nobody runs MS-DOS on a PC anymore.
- Almost no PC has a parallel port anymore. Also the parallel port has to be operated in standard mode. Not EPP or ECP which is standard nowadays.
The first problem was solved by creating a Flash Drive which boots straight into DOS. And luckily, I had an ancient PC with a parallel port collecting dust in the attic which was still working. Then I soldered together a cable and ran the tool. It worked at the first try. Sweet. The printer was alive again. I was happy. But then I got an even better idea.
Raspberry Pi FTW
When I was refilling the cartridge I took a look at the counter board. It only had a single chip on it. A ST Microelectronics 24C04WP. I googled for a data sheet. What do you know? It’s a 4 Kbit EEPROM programmable through a serial I²C bus.
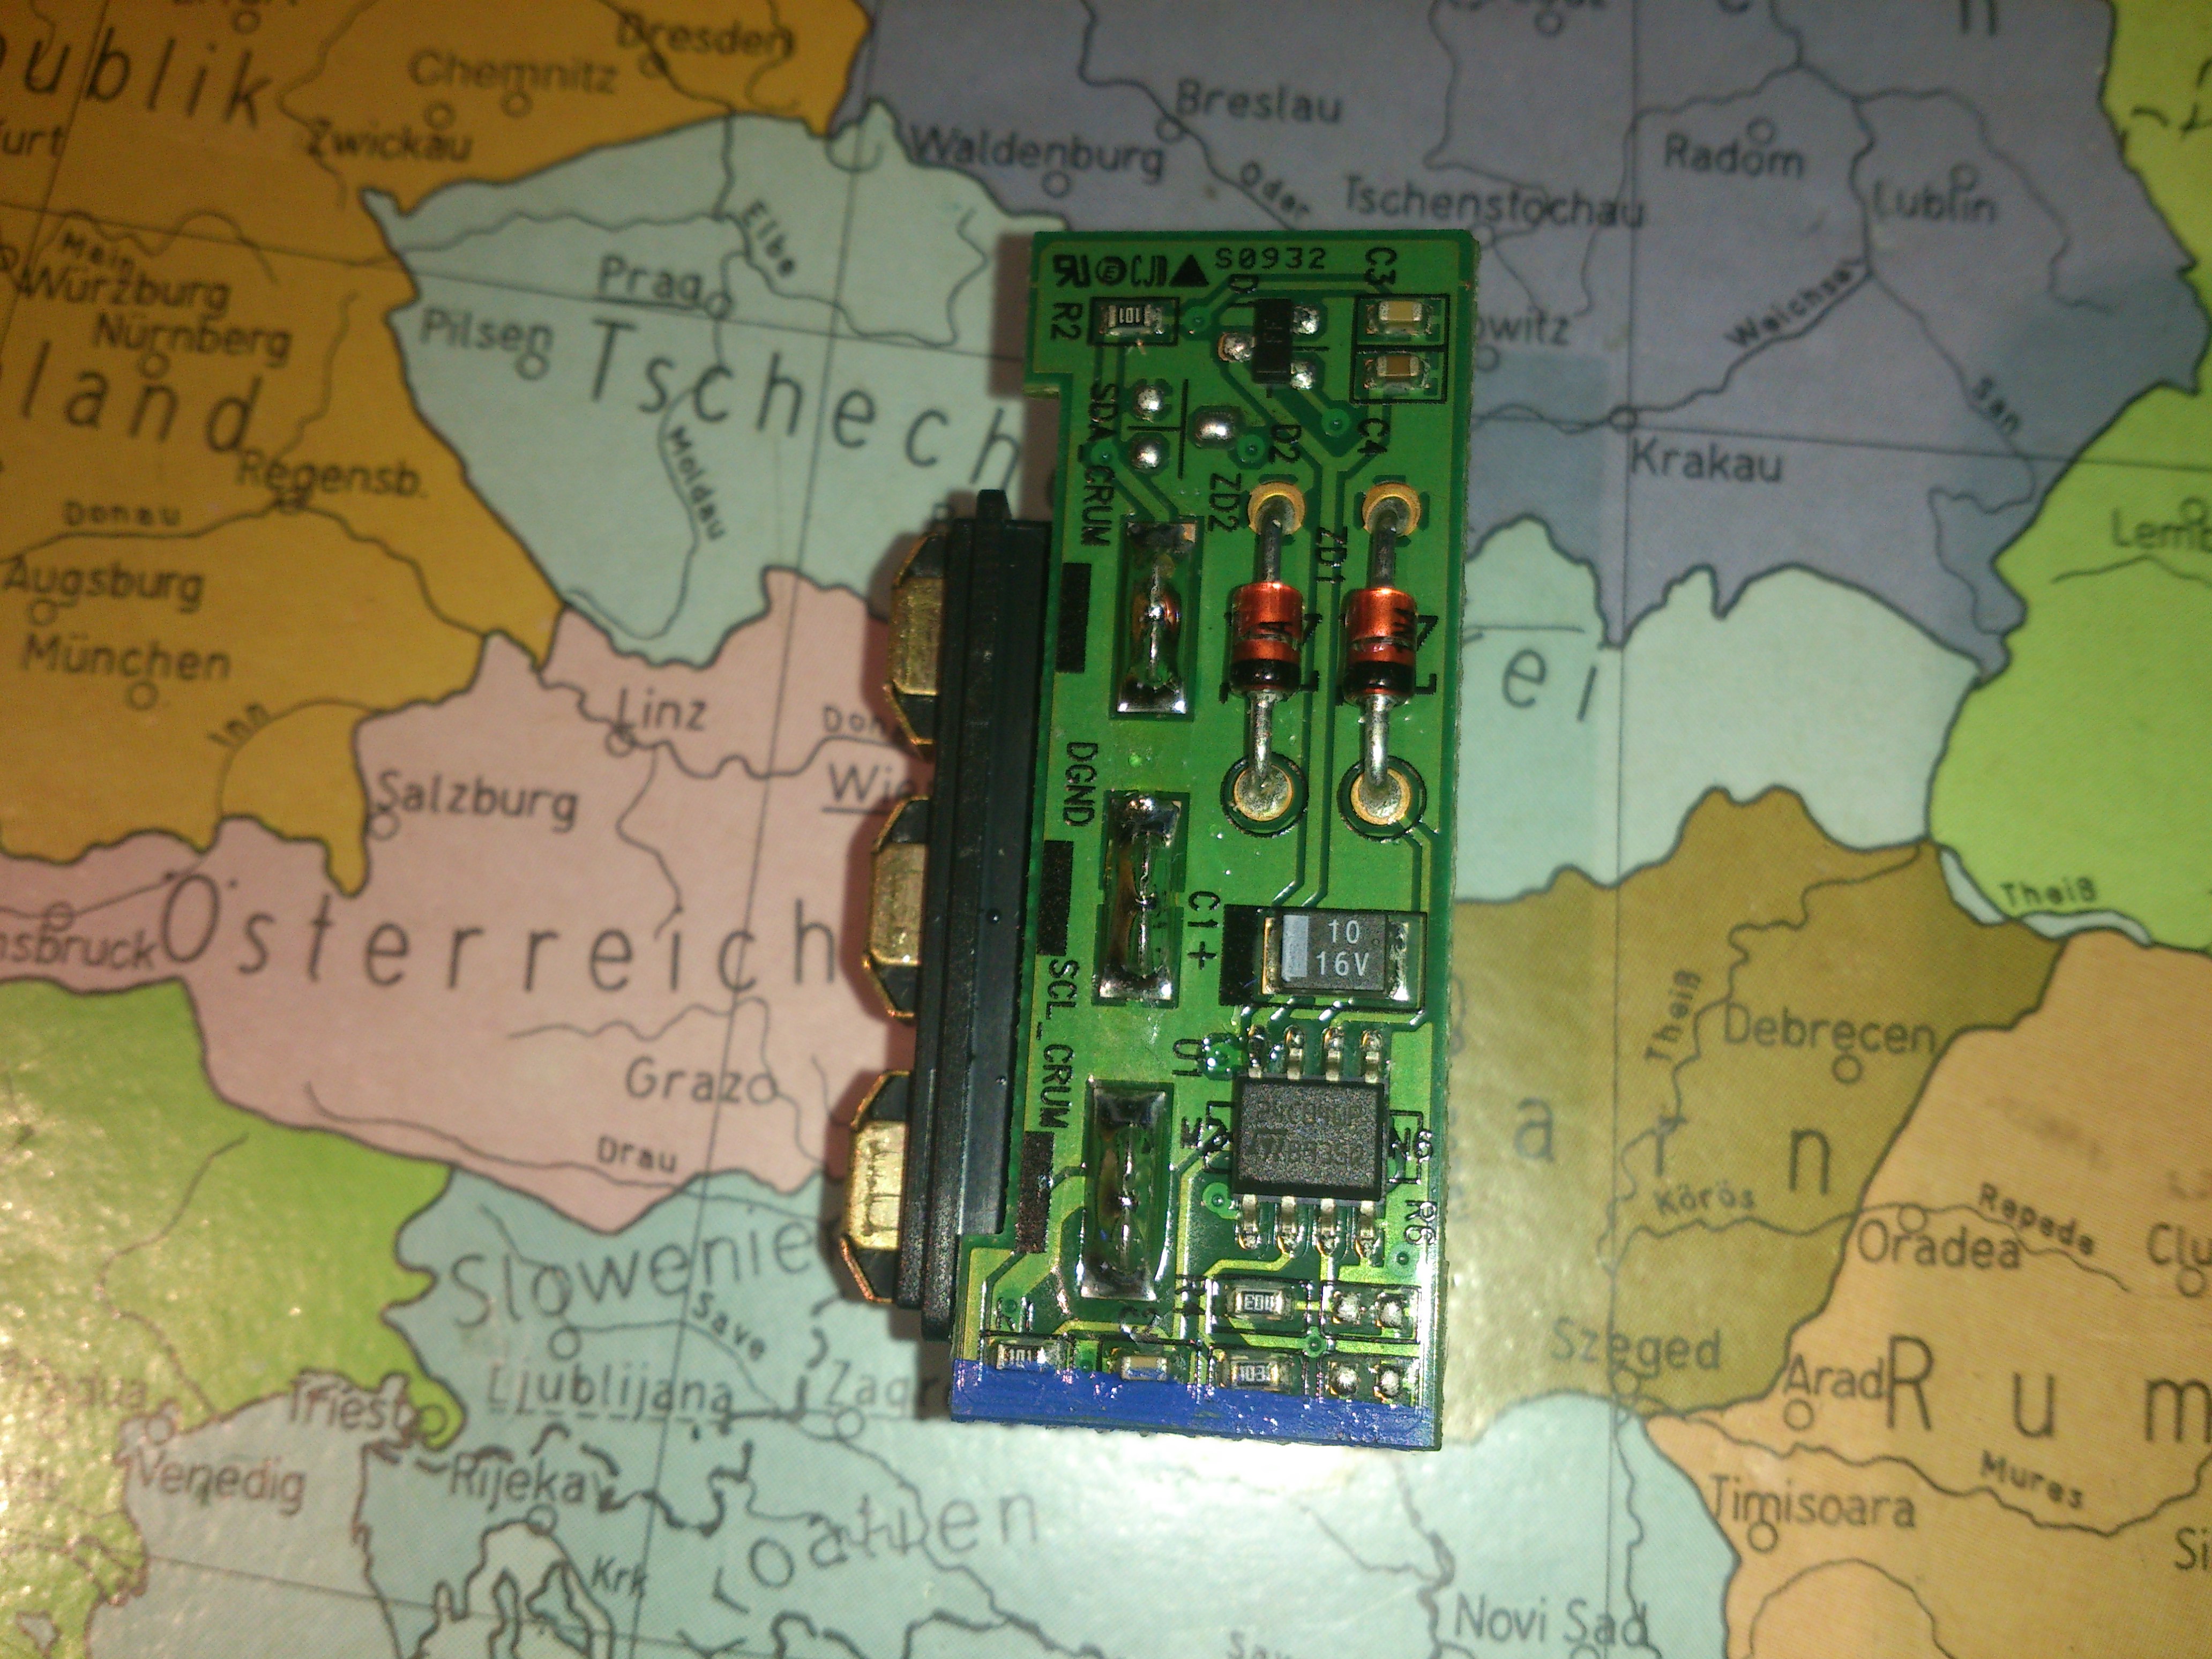
Counter Board with a 24C04WP
Now it dawned on me. Doesn’t the Raspberry Pi have I²C capabilities? Some more goggling. Yes it does! Straight through its GPIO header. I thought it would be really cool to use my Pi to read from and maybe even write back to that EEPROM. That could be really useful. Because more people probably own a Raspberry Pi nowadays then a PC or laptop with a parallel port.
After fiddling around for a couple hours I was indeed able to access the EEPROM with the Raspberry Pi. I write down the steps here for anybody who wants to give it a shot as well:
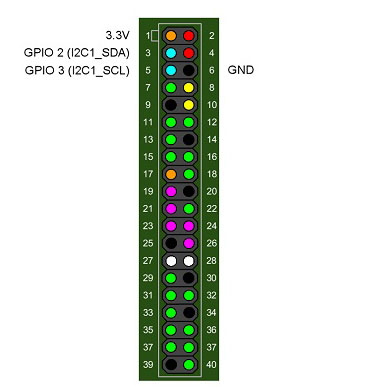
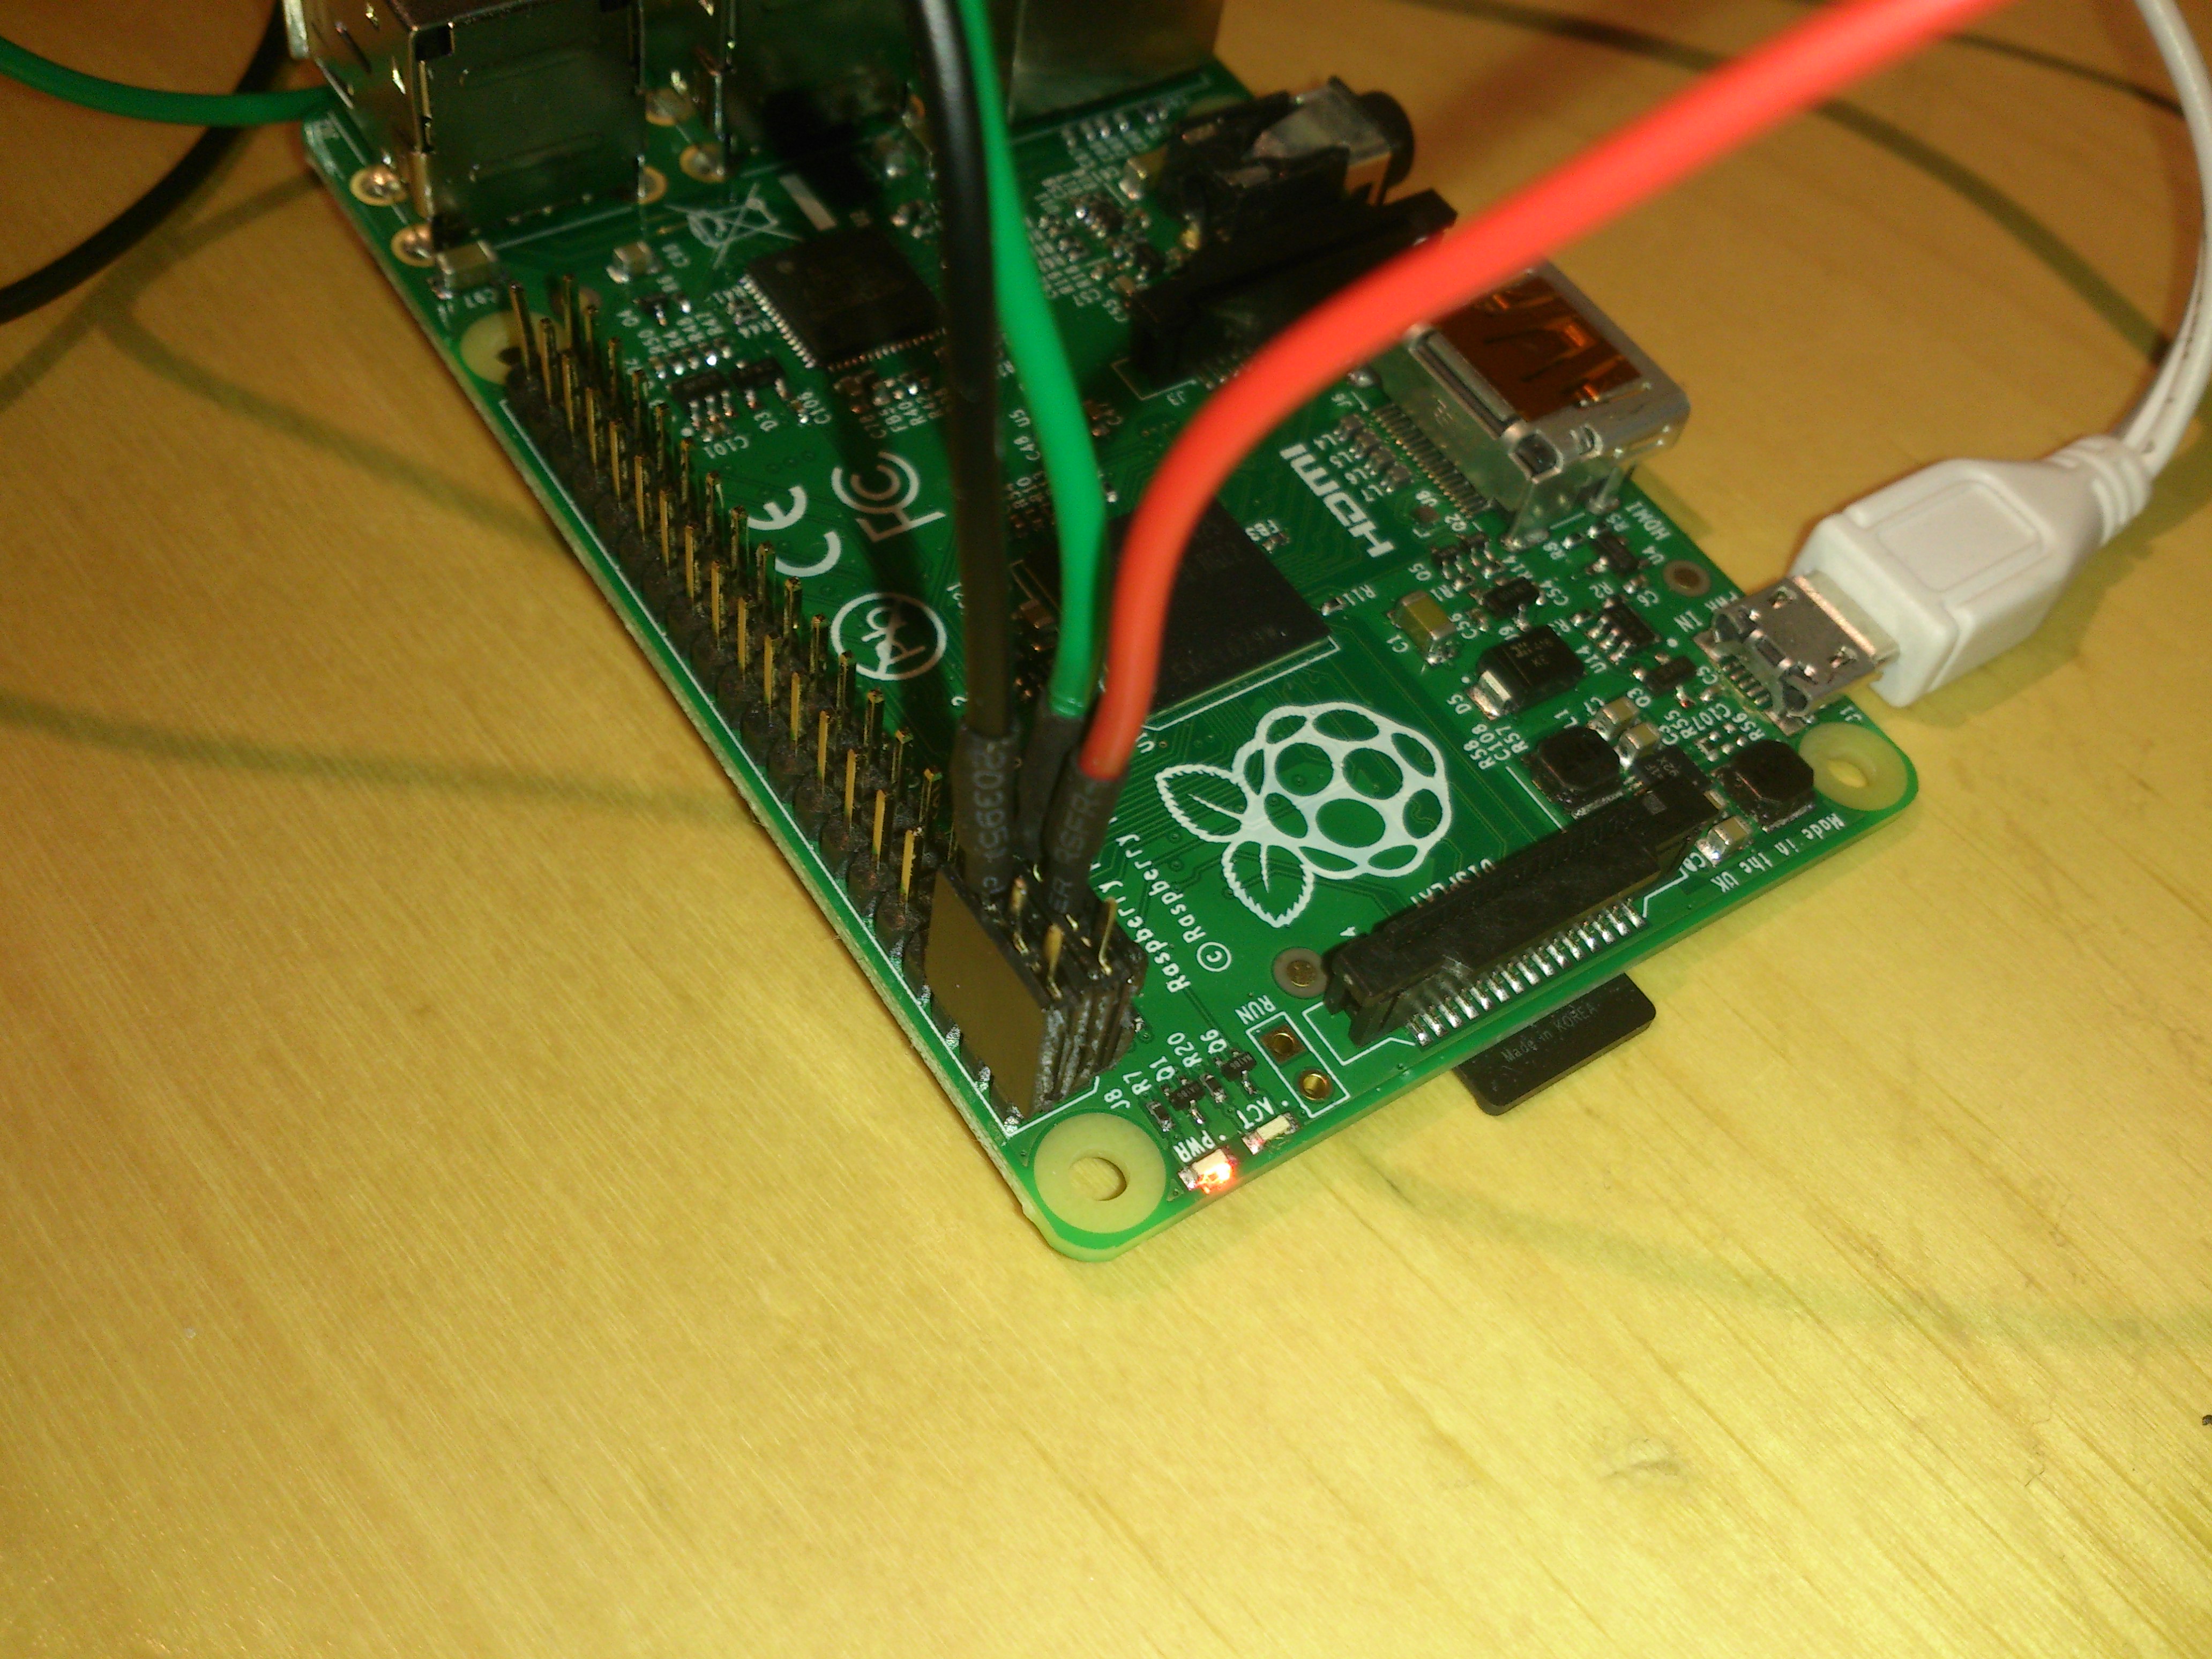
1: Wiring the Cartridge to the Raspberry Pi
The I²C bus uses four pins. VCC (+3.3V), GND, a clock line (SCL) and a data line (SDA). The counter board has however only three contacts. I figure that they are creating the power rail internally by flattening the clock signal. So we only have to connect three pins:
- Raspberry Pi Pin 3 SDA –> left connector on toner (red wire)
- Raspberry Pi Pin 5 SCL –> right connector on toner (green wire)
- Raspberry Pi Pin 6 GND –> middle connector on toner (black wire)
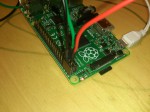
Note that I have a Raspberry Pi model B+. But I think the pin layout is the same on the other models (make sure to check first). Here are some pictures of the pin layout and how I connected the Pi to the toner cartridge. I used some crocodile clips soldered to a 0.1″ female header connector:
-
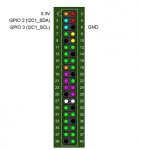
- Raspberry Pi Pin Layout
-
- Closeup of GPIO Header
-

- Connection Overview

-
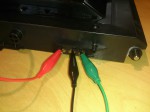
- Closeup of Cartridge

2: Enabling I²C on the Raspberry Pi
I²C is not enabled by default in Raspbian. First, we need to add the i2c modules i2c-bcm2708 and i2c-dev to /etc/modules:
snd-bcm2835
i2c-bcm2708
i2c-dev
Now comment out the module in /etc/modprobe.d/raspi-blacklist.conf:
blacklist spi-bcm2708
#blacklist i2c-bcm2708
On newer Raspbian kernels it might also be necessary to enable I²C in raspi-config:
sudo raspi-config
In Advanced Options select and enable I2C.
After a reboot, the modules should be loaded by default. You can check with lsmod.
Now we also install some tools in order to be able to fiddle with the i2c bus:
sudo apt-get install i2c-tools hexedit
The package i2c-tools contains a tool called i2cdetect, which can be used to probe the i2c bus. The i2c bus at the GPIO header of my Raspberry Pi correlates to the i2c device at bus 1. I am not sure if this is the same with all models. You can also try bus 0 if it doesn’t work:
sudo i2cdetect -y 1
     0  1  2  3  4  5  6  7  8  9  a  b  c  d  e  f
00:          -- -- -- -- -- -- -- -- -- -- -- -- --
10: -- -- -- -- -- -- -- -- -- -- -- -- -- -- -- --
20: -- -- -- -- -- -- -- -- -- -- -- -- -- -- -- --
30: -- -- -- -- -- -- -- -- -- -- -- UU -- -- -- --
40: -- -- -- -- -- -- -- -- -- -- -- -- -- -- -- --
50: -- -- -- -- -- -- 56 57 -- -- -- -- -- -- -- --
60: -- -- -- -- -- -- -- -- -- -- -- -- -- -- -- --
70: -- -- -- -- -- -- -- --
If that works, all is good. Here we can see that there is something available on bus 1 at the addresses 0x56 and 0x57. It turns out that the EEPROM contains 512 bytes in two banks with each 256 bytes, which are addressed through those two i2c addresses.
3: Reading the EEPROM
There exists a handy little tool for Linux called eeprog which can read and program EEPROMs through i2c. However the official version doesn’t work with the 24C04 because of some timing issues. Luckily, there exists a modified version which does not have that problem. The source code can be downloaded here: eeprog-0.7.6-tear5.tar.gz. Extract the tar file and run make to compile the source.
Now we can finally try to read from the EEPROM:
sudo ./eeprog /dev/i2c-1 0x56 -8 -r 0x00:0x100 -f > dump1
eeprog 0.7.6-tear12, a 24Cxx EEPROM reader/writer
Copyright (c) 2003-2004 by Stefano Barbato - All rights reserved.
Copyright (c) 2011 by Kris Rusocki - All rights reserved.
  Bus: /dev/i2c-1, Address: 0x56, Mode: 8bit
  Operation: read 256 bytes from offset 0, Output file: <stdout>
  Reading 256 bytes from 0x0
Note that we use the device /dev/i2c-1, which is the i2c bus 1. And that we are reading 256 bytes through i2c address 0x56 in 8 bit mode. The dumped file should be exactly 256 bytes long. Like I mentioned above, there is a second bank of 256 bytes at address 0x57. But it’s empty, respectively it contains only bytes of value 0xff. So we can ignore that memory area and focus only on the 256 bytes at 0x56.
With hexdump we can display the content of the binary dump:
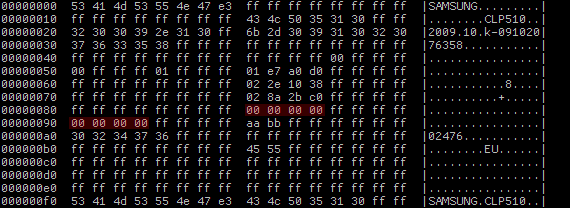
hexdump -Cv dump1
00000000  53 41 4d 53 55 4e 47 e3  ff ff ff ff ff ff ff ff  |SAMSUNG.........|
00000010  ff ff ff ff ff ff ff ff  43 4c 50 35 31 30 ff ff  |........CLP510..|
00000020  32 30 30 39 2e 31 30 ff  6b 2d 30 39 31 30 32 30  |2009.10.k-091020|
00000030  37 36 33 35 38 ff ff ff  ff ff ff ff ff ff ff ff  |76358...........|
00000040  ff ff ff ff ff ff ff ff  ff ff ff ff 00 ff ff ff  |................|
00000050  00 ff ff ff 01 ff ff ff  01 e7 a0 d0 ff ff ff ff  |................|
00000060  ff ff ff ff ff ff ff ff  02 2e 10 38 ff ff ff ff  |...........8....|
00000070  ff ff ff ff ff ff ff ff  02 8a 2b c0 ff ff ff ff  |..........+.....|
00000080  ff ff ff ff ff ff ff ff  00 00 08 82 ff ff ff ff  |................|
00000090  01 a9 23 2f ff ff ff ff  aa bb ff ff ff ff ff ff  |..#/............|
000000a0  30 32 34 37 38 ff ff ff  ff ff ff ff ff ff ff ff  |02478...........|
000000b0  ff ff ff ff ff ff ff ff  45 55 ff ff ff ff ff ff  |........EU......|
000000c0  ff ff ff ff ff ff ff ff  ff ff ff ff ff ff ff ff  |................|
000000d0  ff ff ff ff ff ff ff ff  ff ff ff ff ff ff ff ff  |................|
000000e0  ff ff ff ff ff ff ff ff  ff ff ff ff ff ff ff ff  |................|
000000f0  53 41 4d 53 55 4e 47 e3  43 4c 50 35 31 30 ff ff  |SAMSUNG.CLP510..|
00000100
We have a winner. It seems like it contains some ASCII strings describing the printer and toner model, as well as some other data. Somewhere in there is our page count.
4: Hacking the Counter
What I did next was to print a page and create another dump afterwards. Then I compared those two dumps:
hexdump -Cv dump1 > dump1.hex
hexdump -Cv dump2 > dump2.hex
diff dump1.hex dump2.hex
I highlighted the differences:
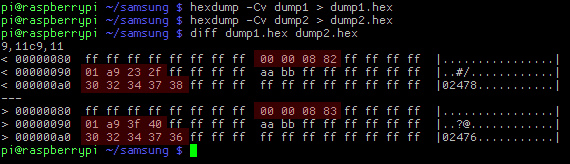
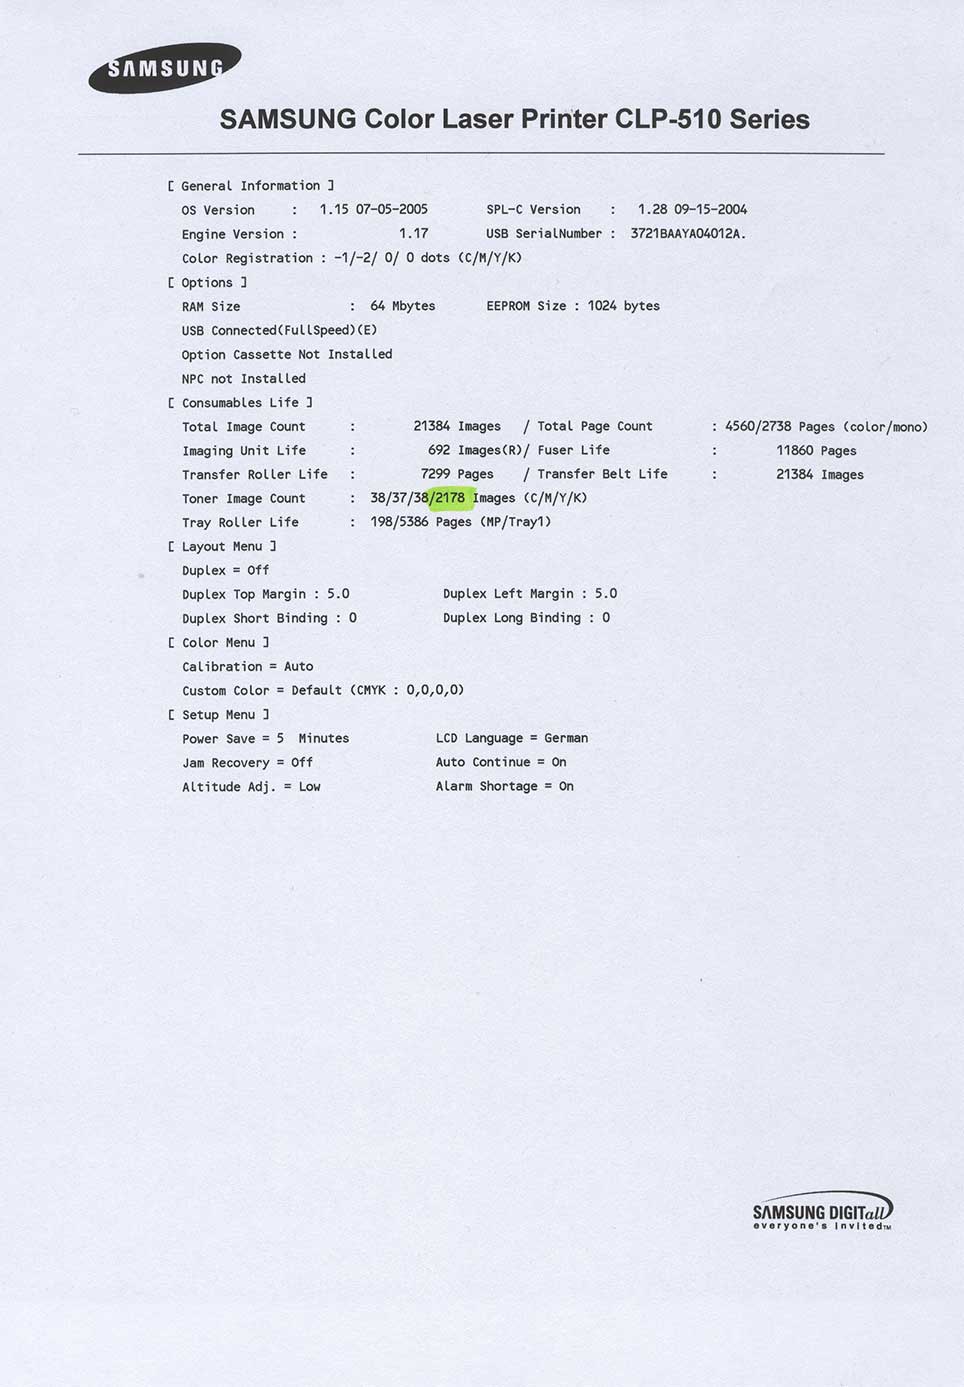
The four bytes at address 0x88 seem to be the page counter. Hex 0x882 equals to 2178 which is exactly what the printer tells me is the page count of the black color. The four bytes at 0x90 are also some sort of counter. Both are counting up. The bytes at 0xa0 are the ASCII representation of a number which is counting down. Maybe it’s the pages left. I am not sure.
Now we can use hexedit to manipulate the dump. After a bit experimentation I found out that only the bytes at 0x88 and 0x90 need to be changed. I did set them both to zero:
Now we can write the dump back to the EEPROM. We again access the memory bank at i2c address 0x56. And we write back the whole dump to memory address 0x00:
sudo ./eeprog /dev/i2c-1 0x56 -w 0x00 -f -t 5 < dump2
eeprog 0.7.6-tear12, a 24Cxx EEPROM reader/writer
Copyright (c) 2003-2004 by Stefano Barbato - All rights reserved.
Copyright (c) 2011 by Kris Rusocki - All rights reserved.
  Bus: /dev/i2c-1, Address: 0x56, Mode: 8bit
  Operation: write at offset 0, Input file: <stdin>
  Write cycle time: 5 milliseconds
  Writing <stdin> starting at address 0x0
................................................................................................................................................................................................................................................................
The parameter -t 5 is important. It causes eeprog to wait 5ms after every byte it writes. The parameter is not available in the original version of eeprog. And it does not work with the 24C04 otherwise (Input/output error). Once the image is written back to the chip you should read it again and check that the correct data was actually written to the EEPROM. If everything worked alright you can load the cartridge back into your printer. And it should now think that has been given a brand new toner cartridge.
Here is a comparison of the status page before and after the reset that I printed on my printer:
-
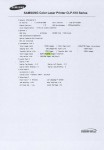
- Toner Status before Reset
-
- Toner Status after Reset
Now isn’t that nice? That saved me some money and I could finally use the hardware capabilities of my Raspberry Pi. I am sure there are other printer models out there which use the same or similar methods to store the page count on the toner cartridge. Let me know if you try that method as well on this printer or some other models.
Happy hacking.
19 Comments
Hello Norbert,
thank you very much for this article! It is very informative and I managed to reset the internal EEPROM of my CLX-3175 with my ODROID C1 🙂 .
At first, as I was running out of toner, I wanted to build a stand-alone-resetter with an ATMEL microcontroller. But then I thought about my ODROID and that it might be much simpler to use this, as to write a complete program for a microcontroller - and indeed it was 😛 !
In the future I will add a RPi Zero to my printer, to make it a WiFi printer and to implement an automatic resetter 🙂 .
Thanks again for sharing this guide!
Greetings from Germany
Hi. Gute Arbeit, Jojo.
Yes, my first thought was also maybe to use an Arduino. But it's great to have all those powerful Linux tools available right there.
Haha. Really geeky idea to use a RPi Zero as Wifi port AND automatic toner count resetter. I love it 🙂
how to reset samsung scx - 4021 s print count in easy way...
Thank you a bunch for sharing this with all people you really recognise
what you're speaking about! Bookmarked. Kindly also talk over with my website =).
We can have a link trade arrangement among us
Howdy,
Many thanks for sharing your experience and wonderful troubleshooting of the Samsung CLP-510 printer. I would like to be lazy and hire your services to correct the issue on some toner cartridges for me! If you are for hire, please contact me at this email.
Jeff
I have one of the newer Samsung SL-C430W colour laser printers, i still have 90% of the toners left from new but am looking at a way to reset these counters...
I think that the best option will be to buy a set of reset chips from Aliexpress, Dump the EEPROM before i use them and then just restore them back to a clean as new state when i refill the cartridge...
Once i have the Dumps i think that setting a repo for clean dumps would be a good idea... what are your thoughts?
Hi Steve.
Yes, would be a great idea to set up a collection of different models.
Although, have you already tried to dump the content of your toner memory? I've heard that newer models use custom chips or even some sort of micro-controller which communicates encrypted with the printer. Those can not easily be dumped.
I have only experience with my CLP-510. The standard EEPROM is easily dumped. Can't say anything about other models.
Norbert.
Hi,
sounds great!.
Do you know if it's possible to do the same hack with Samsung C430 series ?
Thanks
Sorry, I did not read the previous comment... I got my answer... no way for now. Maybe we'll have to flash the entire printer...
Hi. Yes, I can't say if this method would work for the C430. I've seen toner chips for the C430 on eBay however. Search for "C430 chip".
Can any one let me know how to reset EEPROM on Samsung Sl-M2060NW and on toner cartidge MLT110?
Just used this (and speer and my RPI) to reset the page count on a Samsung M2835 image drum (MLT-R116, not toner, the imaging unit). The printer refuses to print after the drum reaches 10000 pages. Thanks for all your hard work!
I can't download the soft from Sad Samsung EEPROM Backup/Restore Utility
Could you sent one to me by email? thanks
lys20010801@hotmail.com
You can download the script from here: https://raw.githubusercontent.com/nharrer/speer/master/speer.py
But you need to have Python installed. Then you can run "python speer.py" from your command prompt.
Hello Norbert! Many thanks for a very interesting post.
I'm trying to understand how a high intensity focused ultrasound cartridge is programmed. It is 8000 lines and after that microchip disables the cartridge. The microprocessor itself is tiny and 3 legs only. I was able to extract some data:
0 1 2 3 4 5 6 7 8 9 a b c d e f
00: 08 09 0a 0b 0c 0d 0e 0f
10: 10 11 12 13 14 15 16 17 18 19 1a 1b 1c 1d 1e 1f
20: 20 21 22 23 24 25 26 27 28 29 2a 2b 2c 2d 2e 2f
30: 30 31 32 33 34 35 36 37 38 39 3a 3b 3c 3d 3e 3f
40: 40 41 42 43 44 45 46 47 48 49 4a 4b 4c 4d 4e 4f
50: 50 51 52 53 54 55 56 57 58 59 5a 5b 5c 5d 5e 5f
60: 60 61 62 63 64 65 66 67 68 69 6a 6b 6c 6d 6e 6f
70: 70 71 72 73 74 75 76 77
After I hexdump -c 256.dump
i got this:
0000000 237 211 365 336 361 P 2 325 c 305 212 m 352 \n \
0000010 340 J 200 \ u 214 332 277 u 366 372 - 232 277 / 244
0000020 J 1 346 212 % 330 217 1 274 027 Q 360 222 226 > U
0000030 A g 340 023 \a 325 274 @ w 366 202 207 207 264 ` 242
0000040 016 023 x 217 341 325 T 236 d 334 7 021 a 002 230 f
0000050 305 306 244 % $ 362 214 233 a 231 6 215 331 216 [ 1
0000060 Y 210 224 336 ` r 362 B 020 ? 307 % 275 326 373 005
0000070 267 V 202 \t 270 235 310 307 N U [ & 347 367 214 023
0000080 \t 2 326 220 ; 231 373 x ^ 277 324 B # 315 D 345
0000090 250 271 321 035 316 212 w 315 037 H # 331 236 R 364 u
00000a0 e 341 266 9 022 h : 374 5 i % 253 324 272 353 t
00000b0 177 207 n 036 313 315 337 L 003 D 225 h { 031 % y
00000c0 262 027 V 354 251 316 6 / 301 H 300 213 030 { 224
00000d0 \t 243 f 223 230 c 035 242 375 < 023 8 n l 320 304
00000e0 / 201 362 376 213 243 o 242 o 353 m 364 347 = 035 036
00000f0 204 T 363 033 373 033 * R 276 X h 305 320 - 342 p
0000100
It shall reflect cartridge number ID: F25DB, used 170 out 09f 8000 lines
DS-3.00 mm
Hi. It seems like the cartridge is responding to the addresses 0x08 through 0x77. From which of those addresses did you take the dump?
I would suggest to take a full dump of all addresses. Then use the cartridge a bit and then take a dump again and compare the two to find out what changed.
If you are lucky, you will see the difference. However the cases where it is that simple are becoming very rare. Nowadays even the cheapest printer cartridges use some sort of encryption and it is impossible to crack that by looking at the data only without any extra knowledge.
Hello Norbert. Many thanks for your comment. I'm not an IT person, I'm a dummy :). I just used the command " hexdump -c 256.dump" Unfortunately, I was not able to upload eeprog 0.7.6-tear12. Do you have it?
The program seems to be here now: https://www.codesink.org/download/eeprog-0.7.6.tar.gz
Note, that you have to compile it with make first (just type "make" in the directory you extracted the tar.gz to).